Chapter 1 — Introduction
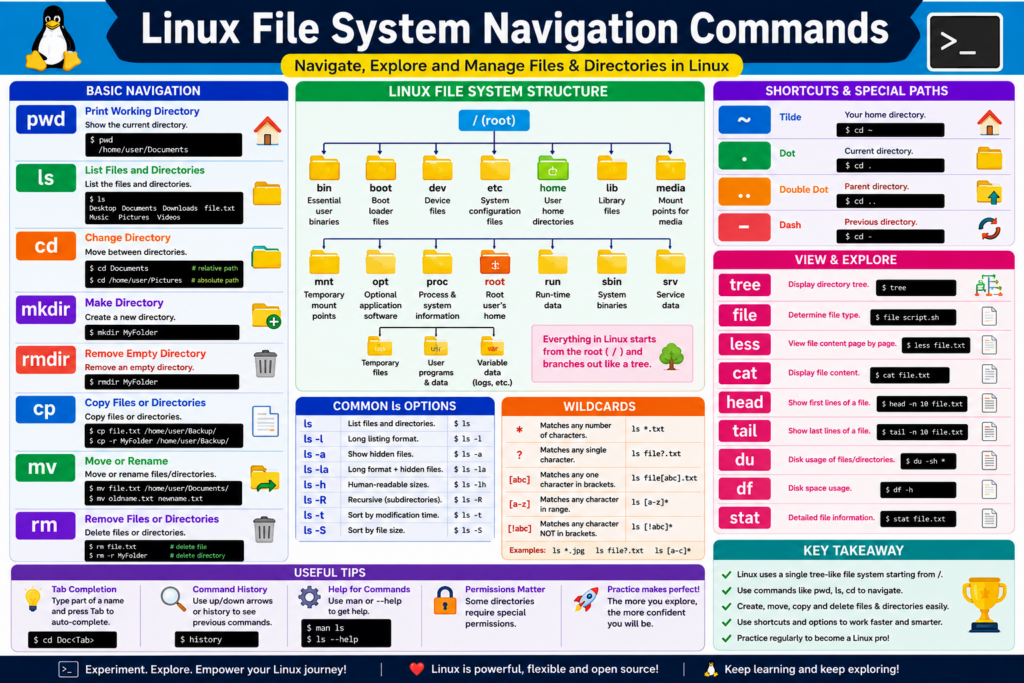
Imagine someone gives you access to a Linux server for the first time.
You open a terminal window.
The screen is almost empty.
There are no desktop icons.
No Start Menu.
No File Explorer.
No folders to click.
Just a blinking cursor waiting for your next command.
At that moment, most beginners ask the same questions.
Where am I?
What files exist here?
How do I move around?
How do Linux administrators navigate systems that contain thousands or even millions of files?
The answer is simple.
They use Linux navigation commands.
In this lesson, we’re going to learn the most important file system navigation commands used every day by Linux users, developers, system administrators, DevOps engineers, and cybersecurity professionals.
By the end of this video, you’ll know how to move through the Linux file system with confidence and understand the basic workflow used on real Linux systems.
Let’s begin.
[IMAGE 1]
Linux Navigation Roadmap
Chapter 2 — Understanding Paths Before Navigation
Before learning navigation commands, we must understand one important concept.
A path.
A path is simply the address of a file or directory.
For example:
/home/gary/Documents
This path tells Linux exactly where something is located.
Think of it like a street address.
A street address tells a delivery driver where a house is located.
A Linux path tells the operating system where a file or directory is located.
Every navigation command in Linux works with paths.
If you understand paths, Linux navigation becomes much easier.
To understand paths, let’s briefly review the Linux directory tree.
Everything begins at the root directory.
Represented by:
/
From root, directories branch outward.
For example:
/
├── home
├── etc
├── usr
├── var
└── dev
The deeper you move into the tree, the longer the path becomes.
Understanding this structure is the foundation of Linux navigation.
[IMAGE 2]
Linux Directory Tree
Chapter 3 — Finding Your Current Location with pwd
Now imagine you’re standing somewhere inside this directory tree.
The first question becomes:
Where am I?
Linux provides a command specifically for this purpose.
pwd
pwd stands for Print Working Directory.
Type:
pwd
The system may return:
/home/gary/Documents
This output tells you exactly where you’re currently located.
Think of pwd as a GPS coordinate.
Whenever you’re unsure of your location, run pwd.
Many Linux users type this command dozens of times per day.
Because before moving somewhere else, you first need to know where you are.
[TERMINAL DEMO]
pwd
Output:
/home/gary
Chapter 4 — Looking Around with ls
Now that we know where we are, the next question is:
What exists here?
The command used to answer that question is ls.
ls stands for list.
Type:
ls
Linux displays files and directories located in the current directory.
Example:
Documents
Downloads
Pictures
Videos
Desktop
Immediately, you gain visibility into your surroundings.
But professional users often need more information.
That’s where command options become useful.
Type:
ls -l
This displays detailed information including:
File permissions
Ownership
Size
Modification date
Filename
Example:
-rw-r–r– 1 gary users 2048 Jan 15 report.txt
To display hidden files:
ls -a
Linux considers files beginning with a period to be hidden.
Examples include:
.bashrc
.profile
.gitconfig
To combine both options:
ls -la
This is one of the most commonly used commands in Linux.
Another useful option is:
ls -lh
The h means human readable.
Instead of showing file sizes in bytes, Linux displays sizes such as:
12K
4.5M
1.2G
This makes information easier to understand.
[TERMINAL DEMO]
ls
ls -l
ls -a
ls -lh
ls -la
Chapter 5 — Moving Through the File System with cd
The most important navigation command in Linux is cd.
cd stands for Change Directory.
This command allows you to move from one directory to another.
Suppose you’re currently inside your home directory.
You want to enter Downloads.
Type:
cd Downloads
Now check your location again.
pwd
Output:
/home/gary/Downloads
You have successfully moved.
This may seem simple, but Linux users perform this operation constantly.
Without cd, navigation would be impossible.
Think of cd as the steering wheel of Linux navigation.
[TERMINAL DEMO]
pwd
ls
cd Downloads
pwd
Chapter 6 — Relative Paths and Absolute Paths
There are two ways to navigate.
Relative paths.
And absolute paths.
Let’s begin with relative paths.
Suppose you’re currently in:
/home/gary
To enter Downloads, you can type:
cd Downloads
Linux starts from your current location.
This is called a relative path.
Now consider this command:
cd /home/gary/Downloads
Notice the difference.
The entire path is provided.
Linux starts at the root directory and follows the complete path.
This is called an absolute path.
Think of it this way.
A relative path is like saying:
Walk to the next room.
An absolute path is like saying:
Drive to 123 Main Street, Apartment 5.
Professional Linux users constantly switch between these two navigation styles.
Understanding the difference is essential.
[IMAGE 3]
Relative vs Absolute Path
Chapter 7 — Linux Navigation Shortcuts
Linux includes several shortcuts that make navigation faster and easier.
The first shortcut is:
~
The tilde symbol represents your home directory.
Type:
cd ~
No matter where you are, Linux immediately returns you home.
The second shortcut is:
..
Double dots represent the parent directory.
Type:
cd ..
Linux moves one level upward.
Example:
/home/gary/Documents
becomes:
/home/gary
The third shortcut is:
.
A single dot represents the current directory.
You’ll often see it when running scripts.
Example:
./script.sh
The fourth shortcut is:
cd –
This command returns you to the previous directory.
Example:
cd /etc
cd /home
cd –
Linux immediately returns to /etc.
Administrators use this shortcut frequently.
Because it saves time when switching between two locations.
[IMAGE 4]
Linux Navigation Shortcuts Cheat Sheet
Chapter 8 — Creating Directories with mkdir
Navigation is not only about moving through existing directories.
Sometimes we need to create our own.
The command is mkdir.
mkdir stands for Make Directory.
Example:
mkdir LinuxCourse
Linux creates a new directory named LinuxCourse.
Verify it using:
ls
To create multiple directories at once:
mkdir notes labs projects
Linux creates all three immediately.
You can also create nested directory structures.
Example:
mkdir -p project/src/include
The -p option automatically creates missing parent directories.
Without -p, Linux would generate an error if parent directories do not already exist.
Software developers use this feature constantly.
[TERMINAL DEMO]
mkdir LinuxCourse
mkdir notes labs projects
mkdir -p project/src/include
Chapter 9 — Removing Directories with rmdir
Not every directory lasts forever.
Sometimes directories are no longer needed.
The simplest removal command is:
rmdir
Example:
rmdir notes
Linux removes the directory.
However, there is an important limitation.
rmdir only removes empty directories.
If files still exist inside, Linux refuses to delete it.
This safety mechanism helps prevent accidental data loss.
Always remember:
rmdir works only on empty directories.
[TERMINAL DEMO]
rmdir notes
Chapter 10 — Copying Files and Directories with cp
Creating backups is a normal part of Linux administration.
The cp command is used for copying files and directories.
Example:
cp report.txt backup/
The original file remains untouched.
A duplicate appears inside the backup directory.
To copy an entire directory:
cp -r project backup/
The -r option stands for recursive.
Linux copies every file and subdirectory.
This command is commonly used for:
Backups
Testing
Configuration management
Project duplication
Whenever you want a second copy without removing the original, use cp.
[TERMINAL DEMO]
cp report.txt backup/
cp -r project backup/
Chapter 11 — Moving and Renaming with mv
The mv command performs two jobs.
It moves files.
And it renames files.
To move a file:
mv report.txt Documents/
The file changes location.
To rename a file:
mv report.txt final_report.txt
Notice that no special rename command is required.
Linux uses mv for both operations.
System administrators rely heavily on this command when organizing systems and restructuring directories.
[TERMINAL DEMO]
mv report.txt Documents/
mv old.txt new.txt
Chapter 12 — Visualizing the File System with tree
As projects grow larger, directory structures become harder to understand.
The tree command solves this problem.
Type:
tree
Linux displays the directory hierarchy visually.
Example:
project
├── src
├── include
├── docs
└── Makefile
This provides an immediate understanding of the project structure.
Many developers use tree when documenting projects or explaining layouts.
If tree is not installed:
sudo apt install tree
Once installed, it becomes an extremely useful navigation tool.
[IMAGE 5]
Project Directory Tree
Chapter 13 — A Real Linux Navigation Workflow
Let’s put everything together.
Imagine you’re starting a new project.
First, check your location.
pwd
List existing files.
ls
Create a new project directory.
mkdir LinuxCourse
Move into it.
cd LinuxCourse
Create subdirectories.
mkdir notes
mkdir labs
Display the structure.
tree
Create a file.
touch lesson1.txt
Copy it.
cp lesson1.txt lesson2.txt
Rename it.
mv lesson2.txt lesson3.txt
Move back to the parent directory.
cd ..
Return home.
cd ~
Notice how multiple navigation commands work together.
This is much closer to what Linux users do in the real world.
They don’t execute commands in isolation.
They combine them into workflows.
[TERMINAL DEMO]
pwd
ls
mkdir LinuxCourse
cd LinuxCourse
mkdir notes
mkdir labs
touch lesson1.txt
cp lesson1.txt lesson2.txt
mv lesson2.txt lesson3.txt
tree
cd ..
cd ~
Chapter 14 — Common Beginner Mistakes
New Linux users often make similar mistakes.
Mistake number one.
Using incorrect capitalization.
Linux is case sensitive.
Downloads
and
downloads
are completely different names.
Mistake number two.
Using incorrect paths.
Always verify your location with pwd.
Mistake number three.
Forgetting spaces.
Example:
cdDownloads
is invalid.
Mistake number four.
Performing file operations without checking the current directory.
Before creating, copying, moving, or deleting files, always verify your location.
A few seconds of verification can prevent major mistakes.
Chapter 15 — Final Summary
Today we learned the most important Linux file system navigation commands.
pwd tells us where we are.
ls shows us what exists around us.
cd moves between directories.
mkdir creates directories.
rmdir removes empty directories.
cp copies files and directories.
mv moves and renames files.
tree visualizes the file system structure.
Together, these commands form the foundation of Linux navigation.
Every Linux administrator, developer, DevOps engineer, cloud engineer, and cybersecurity professional uses these commands regularly.
Master them, and you’ll be able to move through Linux with confidence.
In the next lesson, we’ll go one step further.
Knowing how to move around Linux is important.
But what happens when you don’t know where a file is located?
What if you’re searching for a configuration file, an executable, or a missing document?
That’s where Linux file discovery commands come in.
And that’s exactly what we’ll learn next.
Thank you for watching, and I’ll see you in the next Linux tutorial.