The Linux command line is a versatile tool that provides powerful ways to manage files, execute programs, and control the system. Understanding basic commands and shell features can significantly enhance your efficiency and capability in using Linux.
The Linux command line is a text interface to your computer. Often referred to as the shell, terminal, console, prompt or various other names, it can give the appearance of being complex and confusing to use. Yet the ability to copy and paste commands from a website, combined with the power and flexibility the command line offers, means that using it may be essential when trying to follow instructions online.
Basics of the Command Line
Opening the Terminal
To use the command line, you need to open a terminal emulator, which is a program that provides a text-based interface to the system. Common terminal emulators include:
- GNOME Terminal: For GNOME desktop environments.
- Konsole: For KDE desktop environments.
- xterm: A basic and lightweight terminal emulator.
- Terminal.app: On macOS, which is Unix-based and similar to Linux.
Prompt
When you open a terminal, you’ll see a prompt. The prompt usually looks something like this:
username@hostname:~$
This indicates:
- username: The current user logged in.
- hostname: The name of the computer.
- ~: The current directory (the tilde represents the home directory).
- $: Indicates a regular user. A
#symbol indicates the root user (superuser).
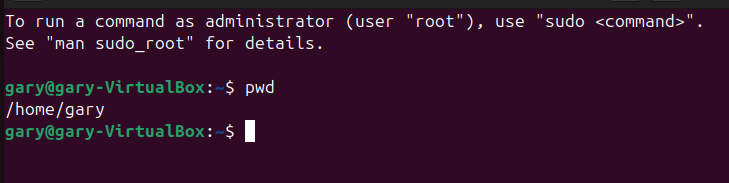
We will use ubuntu to demonstrate the command line. Just search command line in ubuntu and you will find the command line.

Let’s run our first command. Click the mouse into the window to make sure that’s where your keystrokes will go, then type the following command, all in lower case, before pressing the Enter or Return key to run it.
pwd
You should see a directory path printed out (probably something like /home/YOUR_USERNAME), then another copy of that odd bit of text.
Before diving into the details of what the command actually did, there are a couple of basics to understand. First, when you type a command, it appears on the same line as some preceding text. This text indicates that the computer is ready to accept a command and is known as the prompt. You might come across instructions that say “bring up a prompt,” “open a command prompt,” or “at the bash prompt.” These phrases all mean the same thing: open a terminal to access the shell.
Another way to understand the prompt is to think of it as the line in the terminal where you type commands. This is often referred to as the command line. So, if you see the term “command line”—including in the title of this tutorial—it’s just another way of talking about a shell running in a terminal.
The second thing to understand is that when you run a command, any output it produces will usually be printed directly in the terminal. Once the command finishes, you’ll see another prompt. Some commands generate a lot of text output, while others might operate silently and produce no output at all. Don’t be alarmed if you run a command and another prompt immediately appears; that usually means the command succeeded. This practice dates back to the slow network connections of 1970s terminals, where early programmers decided to save precious data transfer by not outputting anything if everything went okay.
Understanding the Location of Linux System
Here are some frequently used Unix commands along with brief descriptions:
File and Directory Management
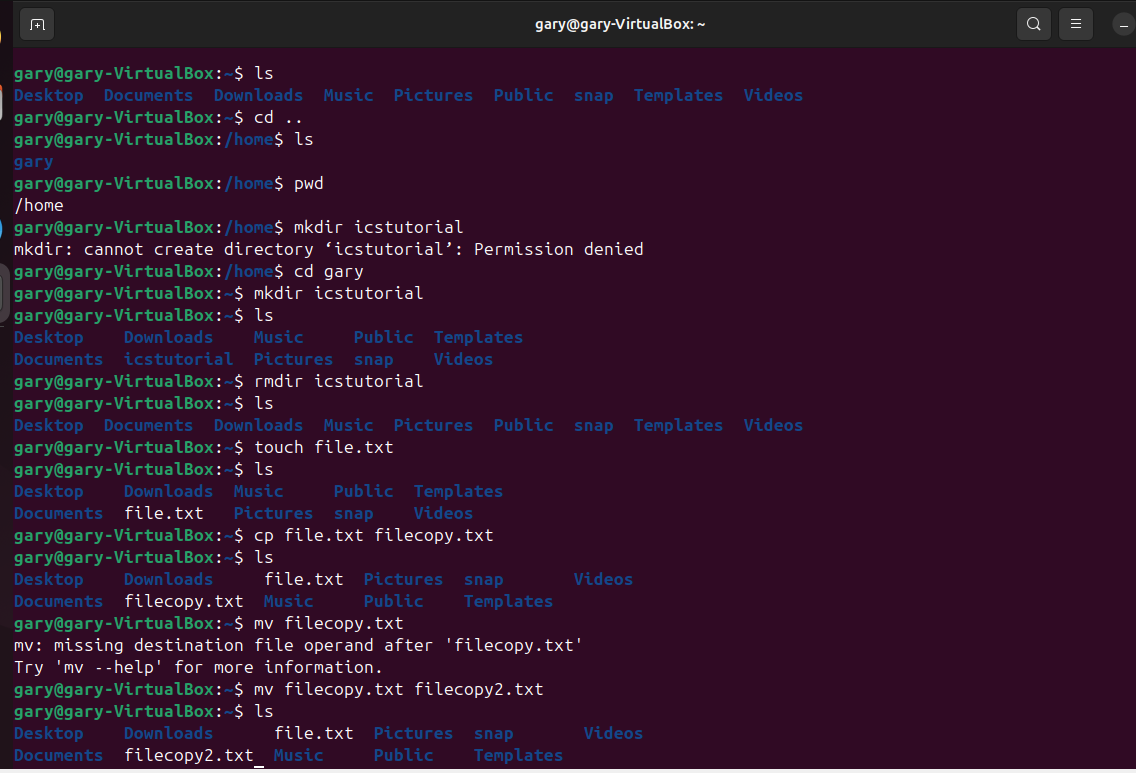
ls- Lists the contents of a directory.
- Example:
ls -l(detailed listing with file permissions, sizes, etc.)
cd- Changes the current directory.
- Example:
cd /home/user(changes to the/home/userdirectory)
pwd- Prints the current working directory.
- Example:
pwd
mkdir- Creates a new directory.
- Example:
mkdir new_folder
rmdir- Removes an empty directory.
- Example:
rmdir empty_folder
cp- Copies files or directories.
- Example:
cp source.txt destination.txt(copiessource.txttodestination.txt)
mv- Moves or renames files or directories.
- Example:
mv oldname.txt newname.txt(renamesoldname.txttonewname.txt)
rm- Removes files or directories.
- Example:
rm file.txt(removesfile.txt)
-
touch
-
- Create a file
$ touch abc.txtCreate a file name abc.txt
File Viewing and Editing
cat- Concatenates and displays file content.
- Example:
cat file.txt(displays the contents offile.txt)
moreandless- View file content one page at a time.
- Example:
less file.txt(allows for backward and forward navigation in the file)
head- Displays the first few lines of a file.
- Example:
head -n 10 file.txt(displays the first 10 lines offile.txt)
tail- Displays the last few lines of a file.
- Example:
tail -n 10 file.txt(displays the last 10 lines offile.txt)
nano,vi, andvim- Text editors for editing files directly from the terminal.
- Example:
nano file.txt(opensfile.txtin the nano editor)
File Permissions
chmod- Changes file permissions.
- Example:
chmod 755 script.sh(sets the permissions ofscript.shto read, write, and execute for the owner, and read and execute for others)
chown- Changes file ownership.
- Example:
chown user:group file.txt(changes the owner and group offile.txttouserandgroup)
System Monitoring
ps- Displays information about active processes.
- Example:
ps aux(displays detailed information about all running processes)
top- Provides a real-time view of system processes.
- Example:
top(continuously updates and displays the most CPU-intensive tasks)
df- Reports file system disk space usage.
- Example:
df -h(displays disk usage in a human-readable format)
du- Estimates file and directory space usage.
- Example:
du -sh folder(displays the size offolderin a human-readable format)
Networking
ping- Tests connectivity to another network host.
- Example:
ping google.com(sends ICMP echo requests togoogle.com)
ifconfig- Displays or configures network interface parameters (deprecated in favor of
ip). - Example:
ifconfig
- Displays or configures network interface parameters (deprecated in favor of
curl- Transfers data from or to a server.
- Example:
curl http://example.com(fetches the content of the specified URL)
wget- Retrieves files from the web.
- Example:
wget http://example.com/file.zip(downloadsfile.zipfromexample.com)
Searching and Filtering
grep- Searches for patterns in files.
- Example:
grep 'pattern' file.txt(searches for ‘pattern’ infile.txt)
find- Searches for files and directories in a directory hierarchy.
- Example:
find /home -name '*.txt'(finds all.txtfiles in the/homedirectory)
awk- Pattern scanning and processing language.
- Example:
awk '{print $1}' file.txt(prints the first column offile.txt)
sed- Stream editor for filtering and transforming text.
- Example:
sed 's/old/new/g' file.txt(replaces all occurrences of ‘old’ with ‘new’ infile.txt)
Compression and Archiving
tar- Archives files.
- Example:
tar -cvf archive.tar folder(createsarchive.tarfromfolder)
gzip- Compresses files.
- Example:
gzip file.txt(compressesfile.txttofile.txt.gz)
unzip- Extracts compressed files.
- Example:
unzip archive.zip(extractsarchive.zip)
These commands cover a wide range of tasks you might need to perform in a Unix environment.