What Is Web Hosting?
Types of Web Hosting
Technical Support
Domain Names
Website Availability
Website Monitoring
Database Access
FTP
Here’s how to host your own website
-
1. Choose a Content Management System (CMS)
-
2. Purchase a Web Hosting Service
-
3. Get a Domain Name
-
4. Connect Your Domain To Your Web Host
-
5. Install WordPress (or Migrate An Existing Site)
-
Bottom Line: Hosting Your Own Website
-
Frequently Asked Questions (FAQs)
Types of Hosting
The following table describes different types of hosting that can be availed as per the need:
| S.N. | Hosting Description |
|---|---|
| 1. | Shared Hosting In shared hosting, the hosting company puts thousand of website on the same physical server. Each customer has their own allocation of physical web space and a set of bandwidth limit. As all websites share same physical memory, MYSQL server and Apache server, one website on the server experiencing high traffic load will affect performance of all websites on the server. |
| 2. | Virtual Private Server (VPS) It is also known as Virtual Dedicated Server. It is a server which is partitioned into smaller servers. In this customer is given their own partition, which is installed with its own operating system. Unlike shared hosting, VPS doesn’t share memory or processor time rather it allocates certain amount of memory and CPU to use which means that any problem on a VPS partition on the same drive will not affect other VPS customers. |
| 3. | Dedicated Server In this kind of hosting, single dedicated server is setup for just one customer. It is commonly used by the businesses that need the power, control and security that a dedicated server offers. |
| 4. | Reseller Hosting A reseller acts as a middle man and sells hosting space of someone else’s server. |
| 5. | Grid Hosting Instead of utilizing one server, Grid Hosting spreads resources over a large number of servers. It is quite stable and flexible. The servers can be added or taken away from the grid without crashing the system. |
step-by-step tutorial on setting up web hosting using cPanel
Web Hosting Tutorial Using cPanel
Step 1: Choosing a Web Hosting Provider
- Research and Select a Hosting Provider:
- Compare different hosting providers based on their features, pricing, and customer reviews.
- Ensure the provider offers cPanel as part of their hosting plans.
- Purchase a Hosting Plan:
- Select a hosting plan that suits your website’s needs (shared, VPS, dedicated, etc.).
- Complete the purchase and receive your hosting account details via email.
Step 2: Accessing cPanel
- Login to cPanel:
- Use the login credentials provided by your hosting provider.
- Typically, cPanel can be accessed by navigating to
yourdomain.com/cpanelor through your hosting provider’s dashboard.
Step 3: Setting Up Your Domain
- Add a Domain:
- In the cPanel dashboard, navigate to the “Domains” section.
- Click on “Addon Domains” to add a new domain to your hosting account.
- Enter the domain name and fill in the required fields (subdomain, document root).
- Point Your Domain to Your Hosting Server:
- Update the domain’s DNS settings at your domain registrar to point to your hosting provider’s nameservers (provided by your host).
Step 4: Uploading Website Files
- Using the File Manager:
- In cPanel, go to the “Files” section and click on “File Manager”.
- Navigate to the public_html directory (default root directory for your website).
- Use the upload option to transfer your website files from your local computer to the server.
- Using FTP:
- Set up an FTP account in cPanel under the “FTP Accounts” section.
- Use an FTP client like FileZilla to connect to your server using the FTP credentials.
- Transfer your website files to the public_html directory.
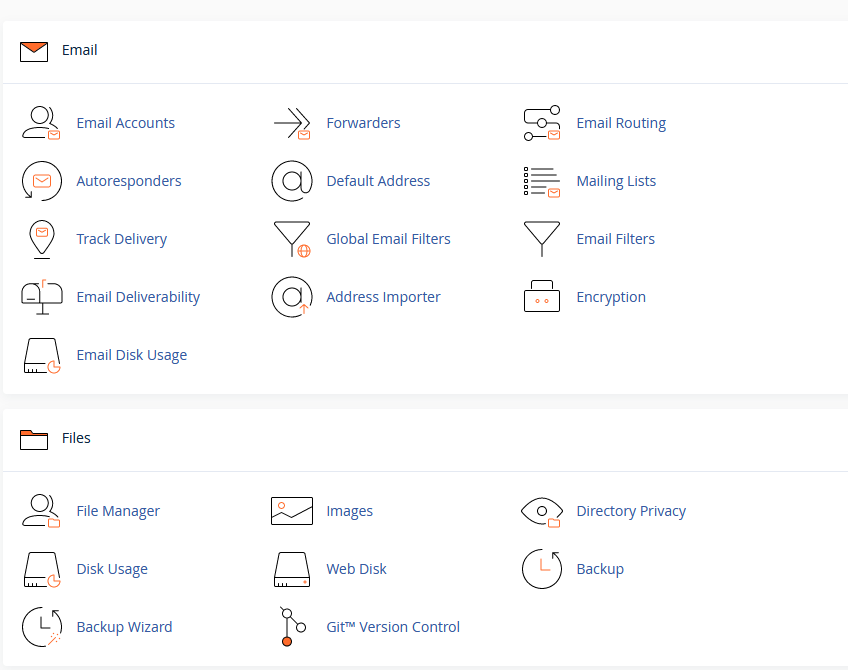
Step 5: Setting Up Email Accounts
- Create Email Accounts:
- Go to the “Email” section in cPanel and click on “Email Accounts”.
- Create new email addresses for your domain by entering the username and password.
- Configure Email Clients:
- Access webmail through cPanel or configure email clients (Outlook, Thunderbird) using the provided settings (IMAP/POP3, SMTP).
Step 6: Setting Up Databases
- Create a Database:
- In the “Databases” section, click on “MySQL Databases”.
- Create a new database and note down the database name.
- Create a Database User:
- Create a new user and assign a password.
- Assign the user to the database with the appropriate privileges.
- Manage Databases with phpMyAdmin:
- Access phpMyAdmin from the “Databases” section to manage your database, import/export data, and run SQL queries.
Step 7: Installing CMS or Software
- Using Softaculous or One-Click Installers:
- In the “Software” section, click on “Softaculous Apps Installer” (or similar).
- Choose a CMS like WordPress, Joomla, or Drupal.
- Follow the installation wizard to set up the CMS on your domain.
Step 8: Securing Your Website
- Install SSL Certificate:
- In the “Security” section, click on “SSL/TLS”.
- Use the AutoSSL feature or manually install an SSL certificate to enable HTTPS for your website.
- Enable Security Features:
- Use tools like IP Blocker, Hotlink Protection, and ModSecurity available in cPanel to enhance your website’s security.
Step 9: Backup and Restore
- Create Backups:
- In the “Files” section, click on “Backup”.
- Generate full or partial backups of your website and download them to your local machine.
- Restore Backups:
- Use the restore options in the Backup section to recover your website from a backup file.
Step 10: Monitoring and Maintenance
- Monitor Website Performance:
- Use tools like AWStats or Webalizer in the “Metrics” section to analyze website traffic and performance.
- Regular Maintenance:
- Keep your website software, plugins, and themes updated.
- Regularly check and manage your website’s security settings and backups.
Following these steps will help you set up and manage your website using cPanel efficiently.