The Linux boot and startup processes are complex and involve several stages.
Here’s a detailed overview of how they work:
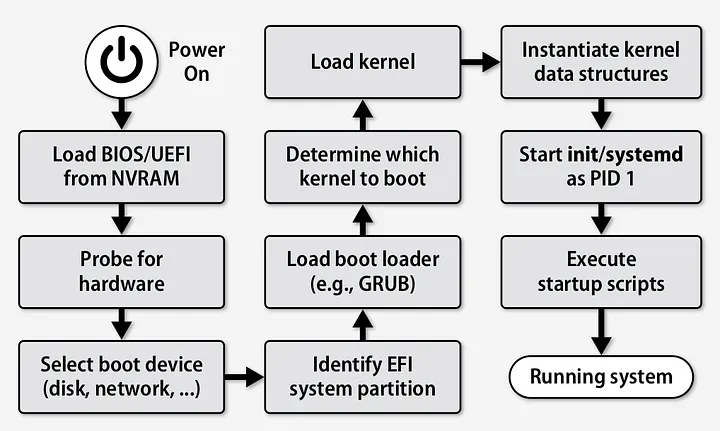
1. BIOS/UEFI Initialization
When a computer is powered on, the BIOS (Basic Input/Output System) or UEFI (Unified Extensible Firmware Interface) is the first piece of code to run.
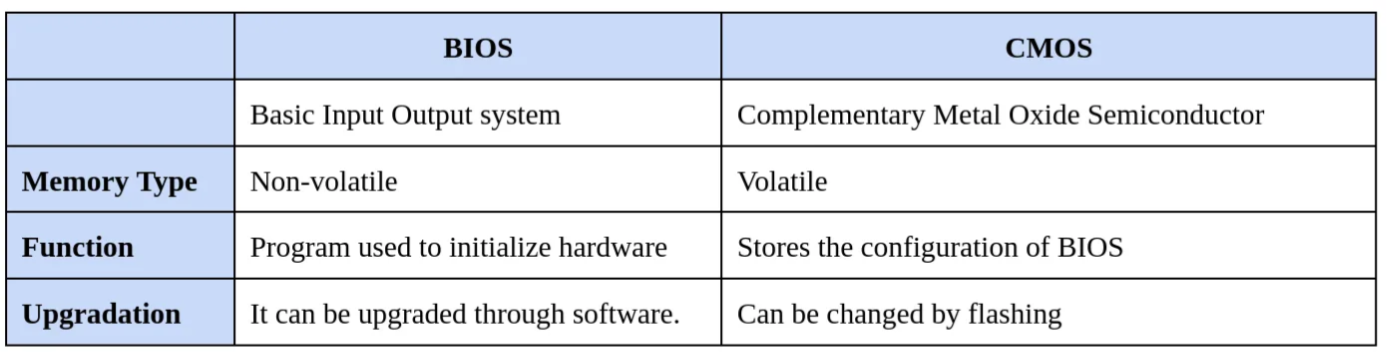
The BIOS is a set of instructions that is written on very low level language. It is the first program installed in computers even before the OS. BIOS is stored in a non-volatile memory called Erasable Programmable Read-only Memory (EPROM) chip and the configuration settings of BIOS is stored in the Complementary Metal-Oxide Semiconductor (CMOS) flash memory.
The lifetime of a CMOS battery is around 10 years. When the battery drains out, CMOS is reset, losing all the custom settings and system clock. It’s a regular practice to remove the battery to recall CMOS settings if there is a configuration problem.
When the computer is powered on, the CPU approaches the BIOS to check if all the basic hardware required to start the computer is ready. This checking is known as the Power of Self Test (POST). POST process only happens when performing a so-called “cold boot” (turning on a powered off system); a “warm boot” (i.e. restarting the computer) leaves a special flag in the BIOS non-volatile memory that bypasses this task of checking.
The POST checks are performed majorly on:
- Hardware elements like processor, storage devices and memory.
- Basic System Devices like keyboard, and other peripheral devices.
- CPU Registers
- DMA (Direct Memory Access)
- Timer
- Interrupt controller
When POST is successfully finalized, bootstrapping is enabled. Bootstrapping starts the initialization of the OS. The process of booting from disk works by loading its first sector to memory known as Master Boot Record (MBR) and trying to execute it.
The BIOS then searches for, loads, and runs the boot loader program stored in the Master Boot Record (MBR). The MBR is sometimes kept on a USB stick or CD-ROM, such as during a live Linux installation.
When the boot loader program is detected, it is loaded into memory and the BIOS gives it control of the computer.
Its primary functions are:
- Performing hardware initialization (POST – Power-On Self-Test).
- Locating and executing the bootloader program from the storage device (e.g., HDD, SSD).
2. Bootloader
The bootloader is a small program that loads the Linux kernel into memory and transfers control to it. When the boot loader program is detected, it is loaded into memory and the BIOS gives it control of the computer. MBR is an abbreviation for Master Boot Record. It’s responsibility is to load and run the GRUB boot loader. MBR is found in the first sector of the bootable drive. Its physical location is in the cylinder 0, head 0, sector 1. In most cases, /dev/had or /dev/sda.
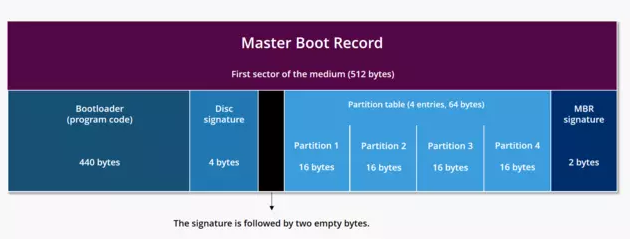
MBR is 512 bytes in size and consists of three components. The primary boot loader information is stored in the first 446 bytes. The next 64 bytes include partition table information. The last two bytes contain an MBR validation check.
The MBR is only 512 bytes in size and contains machine code instructions for booting the machine, called a boot loader, along with the partition table. The first 446 bytes are the primary boot loader, which contains both executable code and error message text. The next 64 bytes are the partition table, which contains a record for each of 4 partitions (16 Bytes each). The MBR ends with 2 bytes that are defined as the magic number (0xAA55). The magic number serves as a validation check of the MBR.
The job of MBR is to find and load the secondary boot loader. It does this by looking through the partition table for an active partition. When it finds an active partition, it scans the remaining partitions in the table to ensure that they’re all inactive. When this is verified, the active partition’s boot record is read from the device into RAM and executed.
In older systems, the MBR also stores information about GRUB, or LILO.
The secondary bootloader is called the kernel loader. The task of this is to load the Linux kernel and optional initial RAM disk. The first- and second-stage boot loaders combined are called GRand Unified Bootloader (GRUB).
GRand Unified Bootloader (GRUB) includes knowledge of Linux file systems. Instead of using raw sectors on the disk, as LILO does, GRUB can load a Linux kernel from an ext2 or ext3 file system. It does this by making the two-stage boot loader into a three-stage boot loader.
Common Linux bootloaders include GRUB (GRand Unified Bootloader) and LILO (LInux LOader). The bootloader stages are:
- Stage 1: The initial part, which is loaded by the BIOS/UEFI, typically located in the Master Boot Record (MBR) or the EFI System Partition (ESP).
- Stage 2: This part of the bootloader presents the user with a boot menu and loads the selected kernel and initramfs (initial RAM filesystem) into memory.
The secondary boot loader reads the operating system or kernel as well as the contents of /boot/sysroot/ into memory. Once GRUB determines which operating system or kernel to start, it loads it into memory and transfers control of the machine to that operating system.
3. Kernel Initialization
All of the kernels are in a self-extracting, compressed format to save space. The kernels are located in the /boot directory, along with an initial RAM disk image, and device maps of the hard drives.
After the selected kernel is loaded into memory and begins executing, it must first extract itself from the compressed version of the file before it can perform any useful work. Once the kernel has extracted itself, it loads systemd, which is the replacement for the old SysV init program, and turns control over to it.
This is the end of the boot process. At this point, the Linux kernel and systemd are running but unable to perform any productive tasks for the end user because nothing else is running.
Once the bootloader loads the Linux kernel and initramfs, the kernel performs several tasks:
- Hardware Detection: Initializes and configures all detected hardware devices.
- Driver Initialization: Loads drivers for the hardware components.
- Mounting the Root Filesystem: Switches from the initramfs to the real root filesystem.
4. Init System
At this moment, your system executes runlevel applications. To determine the Linux run level, it would look for an init file, normally found at /etc/inittab.
After the kernel has initialized the hardware and mounted the root filesystem, it starts the init system. The init system is the first process started by the kernel (PID 1) and is responsible for managing system initialization and services.
Modern Linux systems use systemd to select a run level. The Linux operating system includes seven (7) different run levels.
• 0 – halt
• 1 – single-user mode
• 2 – Multiuser, without NFS
• 3 – Full multiuser mode
• 4 – unused
• 5 – X11
• 6 – reboot
Init will examine and identify the default initlevel from the file “/etc/inittab” in order to load all appropriate programs for the run level.
You may determine your system’s default run level by running the following:
$ grep initdefault /etc/inittab
Some of most important tasks performed by init are as following:
- Check the root file system and remount it in read/write mode. Up to this point, root file system is mounted in read-only mode.
- Check and mount additional file systems.
- Initialize network cards. Some processes are triggered by the network card initialization, such ntpdate (used to synchronize local time with a network time server).
- Start daemons. Some daemons support the system processes, such as crond and syslogd. Some allow remote access, such as sshd and telnetd. And some represent actual network services such as named and httpd.
- Sets getty on physical or virtual terminals. This allows the user connected to a terminal to login and use the shell.
Common init systems include:
- SysVinit: Traditional init system, which uses shell scripts in
/etc/rc.dto start services. - Upstart: Event-based replacement for SysVinit, used in some older Linux distributions.
- systemd: Modern init system that uses unit files for service management, found in most contemporary Linux distributions.
5. Runlevel/Target Initialization
A runlevel is essentially a set of capabilities or running services that you can pre-define and set the system to boot to so you have a predictable set of services. It defines the number and type of daemons that are loaded into memory and executed by the kernel on a particular system. Because the init daemon often has to manage several daemons at once, the init daemon categorizes the system into runlevels.
The system administrator sets the runlevel in which the Linux system starts, which in turn determines which set of programs is running and can also change the runlevel at any time while the system is running. The system boot process is considered complete when all the enabled services are operational for the boot target and users are able to log in to the system.
There are currently three popular initialization process methods used in Linux distributions:
Systemd for system daemon is the newest system initializing for the SysVinit model replacing both init and Upstart that is responsible for starting all kinds of things in new Linux distributions. It has fast-tracked system initialization and state transitioning by introducing parallel processing of startup scripts, improved handling of service dependencies, and an on-demand activation of service daemons using sockets and D-Bus. The systemd initialization process introduced a major paradigm shift in how Linux systems handle services.
Instead of using shell scripts and runlevels, the systemd method uses units and targets. A systemd unit defines a service or action on the system which consists of a name, a type, and a configuration file while a systemd target represents a different group of services that should be running on the system.
The system will examine and execute run-level programs from the folders listed below:
• Run level 0 – /etc/rc.d/rc0.d/
• Run level 1 – /etc/rc.d/rc1.d/
• Run level 2 – /etc/rc.d/rc2.d/
• Run level 3 – /etc/rc.d/rc3.d/
• Run level 4 – /etc/rc.d/rc4.d/
• Run level 5 – /etc/rc.d/rc5.d/
• Run level 6 – /etc/rc.d/rc6.d/
It should be noted that the actual location of these directories vary from distribution to distribution.
- Runlevel 0 or Halt is used to shift the computer from one state to another. It shut down the system.
- Runlevel 1, s, S or Single-User Mode is used for administrative and recovery functions. It has only enough daemons to allow one user (the root user) to log in and perform system maintenance tasks. All local file systems are mounted. Some essential services are started, but networking remains disabled.
- Runlevel 2 or Multi-user Mode is used for most daemons running and allows multiple users the ability to log in and use system services but without networking. On Debian and its derivatives, a full multi-user mode with X running and a graphical login. Most other distributions leave this runlevel undefined.
- Runlevel 3 or Extended Multi-user Mode is used for a full multi-user mode with a console (without GUI) login screen with network services available
- Runlevel 4 is not normally used and undefined so it can be used for a personal customization
- Runlevel 5 or Graphical Mode is same as Runlevel 3 with graphical login _(such as GDN)_.
- Runlevel 6 or Reboot is a transitional runlevel to reboot the system.
You’ll find programs that begin with a “S” or “K” for startup or kill in the various run level directories.
Depending on the init system, the process differs:
- SysVinit: Uses runlevels (0-6) to determine which services to start. For example, runlevel 5 is typically used for a multi-user graphical environment.
- systemd: Uses targets (e.g.,
multi-user.target,graphical.target) to determine the state and services to be started.
6. Service Management
The init system (e.g., systemd) then starts the necessary services and daemons as defined by the runlevel or target. This includes:
- Network services.
- Display managers (for graphical environments).
- Logging services.
- Any other background services required by the system.
7. User Login
Finally, the system provides a login prompt:
- Console Login: For non-graphical environments, a login prompt is provided on the console (handled by
getty). - Graphical Login: For graphical environments, a display manager (e.g., GDM, LightDM) provides a graphical login screen.
8. User Session Initialization
After the user logs in, the system initializes the user session:
- Loads user-specific configurations and preferences.
- Starts the user’s desktop environment (for graphical sessions) or command shell (for non-graphical sessions).
Summary of Key Stages
- BIOS/UEFI Initialization: Hardware check and bootloader execution.
- Bootloader: Loading the kernel and initramfs.
- Kernel Initialization: Hardware and driver setup, root filesystem mounting.
- Init System: Managing the startup of services (systemd, SysVinit, or Upstart).
- Runlevel/Target Initialization: Starting the appropriate set of services.
- Service Management: Running background services.
- User Login: Providing login prompts.
- User Session Initialization: Starting the user’s environment.
This entire process ensures the system is properly configured and ready for user interaction.