Domain Name Registration Tutorial
Step 1: Choose a Domain Name
- Brainstorm Ideas:
- Think of a name that is relevant to your website’s content or business.
- Keep it short, memorable, and easy to spell.
- Check Availability:
- Use a domain name search tool to check if your desired domain name is available.
- Many domain registrars provide search tools to check domain availability.
Step 2: Select a Domain Registrar
- Research Registrars:
- Compare different domain registrars based on pricing, features, and customer reviews.
- Popular registrars include GoDaddy, Namecheap, Google Domains, and Bluehost.
- Create an Account:
- Sign up for an account with your chosen domain registrar.
Step 3: Register Your Domain
- Search for Your Domain:
- Use the registrar’s search tool to find your desired domain name.
- If the name is available, proceed to the next step. If not, consider alternative names or extensions.
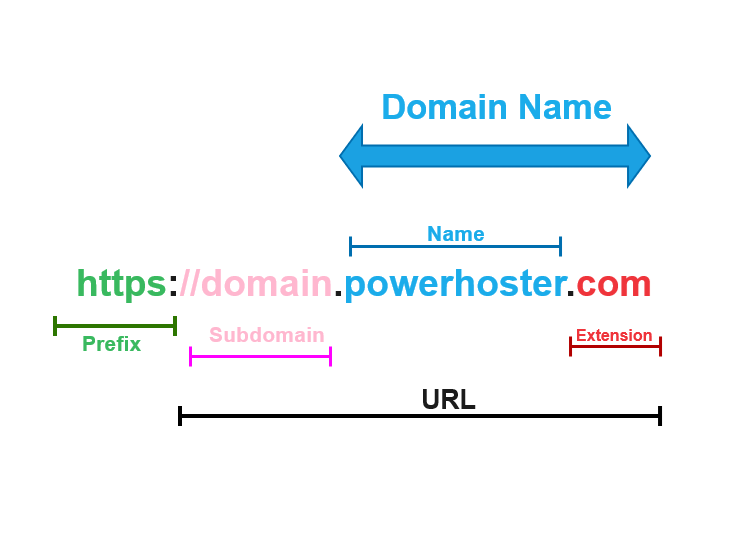
- Choose a Domain Extension:
- Common extensions include .com, .net, .org, but there are many others like .co, .info, .biz, etc.
- Select the extension that best suits your website or business.
- Add to Cart and Checkout:
- Once you find an available domain name, add it to your cart.
- Review your order and proceed to checkout.
- Enter Registration Details:
- Provide the necessary contact information (name, address, email, phone number) for the domain registration.
- This information will be used for the WHOIS database, but you can opt for domain privacy protection to keep your details private.
- Select Registration Period:
- Choose the length of time for which you want to register the domain (usually 1 to 10 years).
- Many registrars offer discounts for longer registration periods.
- Add Extras (Optional):
- Domain privacy protection: Keeps your personal information private.
- Email forwarding: Forward emails from your domain to another email address.
- Website hosting: Some registrars offer web hosting services as well.
- Complete Payment:
- Enter your payment information and complete the purchase.
- You will receive a confirmation email with the details of your domain registration.
Step 4: Verify Your Domain Registration
- Email Verification:
- Some registrars require you to verify your email address as part of the registration process.
- Check your email for a verification link and follow the instructions to verify your email.
- WHOIS Verification:
- Verify that your domain registration details are correctly listed in the WHOIS database.
- You can check this using a WHOIS lookup tool.
Step 5: Set Up Your Domain
- Access Your Domain Management Dashboard:
- Log in to your account on the registrar’s website.
- Go to the domain management section.
- Update DNS Settings:
- If you have a web hosting service, update the DNS settings to point your domain to your hosting provider’s servers.
- Use the nameservers provided by your hosting provider.
- Enable Domain Privacy (if not already done):
- Ensure that domain privacy protection is enabled to keep your personal information private.
Step 6: Renew Your Domain
- Set Up Auto-Renewal (Optional):
- To avoid losing your domain, enable auto-renewal if your registrar offers this feature.
- Monitor Expiry Dates:
- Keep track of your domain’s expiry date and renew it before it expires to maintain ownership.
Following these steps will help you successfully register a domain name and set it up for use with your website.